(Security) Static Code Analysis in Maven Builds

Automating static code analysis is key to making static code analysis a useful tool for application security. Maven is a very powerful build management tool, and in combination with tools provided by the community, greatly helps to define and enforce static code analysis rules. Maven comes with an integrated versioning mechanism of the build configuration, which makes it an ideal tool to enforce a static code analysis strategy in an auditable fashion – not only for Java projects!

The table below gives an overview of how Maven can be used to support static code analysis. There are of course many alternatives, but the following plugins are what I commonly recommend for the projects I am working with.

The Maven Compiler Plugin and the POM file configuration enforces compiler settings and options.

The Maven Dependency Plugin, the Maven Checkstyle Plugin, the Maven PMD Plugin, and the Findbugs Maven Plugin can be configured to:

  • Enforce code conventions (formatting, whitespace, naming, …)
  • Find unsafe functions as well as unsafe or incorrect use of functions, and provide recommendations of safer alternatives (e.g. for concurrency)
  • Enforce API design best practices
  • Enforce coding best practices
  • Set a standard and enforce proper creation of documentation, such as Javadocs

While proper API documentation is not always considered part of security, it is very helpful for auditors when doing code reviews / security audits, which is why I always include code documentation.

The Maven plugins mentioned above are all open source and available free of charge. However, there are also commercial options available. For example, with their Fortify toolkit HP provides an excellent static code analysis tools, and The Fortify plugin for Maven (which is part of the standard Fortify distribution) can be configured for direct automated integration of Fortify into the Maven build.

Security Static Code Analysis

Security static code analysis is performed together with other static code analysis methods at or before compilation time. The biggest advantage of using static code analysis tools is that they can be used in the very early stages of the projects, long before the code has reached a state where it can be executed and evaluated with traditional quality assurance methods. With the high level of automation that can be achieved, static code analysis is an ideal tool to introduce a minimum code quality level without wasting the precious time of security experts on routine manual reviews. Common automation options in particular include automated execution of code auditing at check-in to SCM, as well as automated failing of a build in centralized build environments (e.g. when using CI systems such as Jenkins).

Static code analysis tools cover a broad range of code analytics options, ranging from trivial pattern matching tools to find comments in the code like “todo” or “fixme”, up to very complex execution path analysis tools. Such advanced tools can observe, for example, a specific variable through the execution path of a method and make deductions on the reliability and sanitation status of data stored in such variables.

Depending on the policies of the organizations and products, any form of static code analysis may be security relevant. While it is common understanding that execution path analysis often provides valuable insights on security, some organizations may decide that enforcing specific code formatting is relevant to their security program. One justifications for this is that a common definition of whitespace across the project’s developer community makes semi-automated code reviews easier.

For these reasons, static code analysis is mostly policy driven, and the (secure) coding policies that an organization defines ultimately drives the selection of tools and their configuration. Consequently, the selection of approved tools and their (project specific) configuration is key in making static code analysis a significant contributing factor to application security. As with any policy, the static code analysis rule set, as well as the list of approved tools need periodic reviews to make sure that the latest advances in security research and subsequent tool improvements are incorporated into a project’s security strategy.

Splitting Control of Your Build

Enabling a CI/CD (Continuous Integration / Continuous Delivery [Deployment]) to create an automated build tool chain commonly requires splitting responsibility and hence control of the build process. A combination of a build management tool like Maven, the Maven Dependency Management plugin, and a reporting engine in a CI tool like Jenkins allows an organization to create a hierarchical control set to specify the behavior of a build.

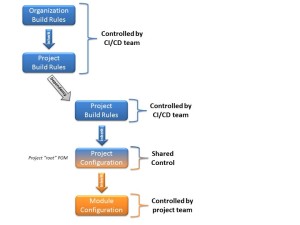
2014-04-18 - Splitting Control of Your BuildAs an example, on organization could decide to put organization wide rules in place on how to run secure static code analysis. The organization could empower the CI/CD team to enforce these rules, and also grant exceptions. The CI/CD team could them make these rules available as two Maven POM files: one with the organization wide rules, and one with project specific exceptions to grant the necessary flexibility.

Projects that inherit their project configuration from the global CI/CD configuration can make further adjustments on a local level, as permitted by the organization’s policy. Maven makes such a setup easily possible through project inheritance, and also allows enforcing usage of the correct ancestors through the Maven Dependency Plugin.

The CI/CD team has a choice of how tightly they want to enforce rules. As an example, they could decide to host the source of the build rules POM files in a dedicated source control repository, or store it with the project sources. They can decide if they want to make these rules a dedicated Maven project, or lump it together with the source code project (I generally recommend making it a separate project to make automated versioning easier).

The illustration shows a common enterprise style Maven build setup in a multi-module Maven build, with the blue boxes representing the centrally controlled components of the build configuration (usually represented by at least two different POM files), and the orange box representing the source code modules under the control of the project team. The blue/orange colored box represents the project root POM file, which is commonly where the main project build starts.

I usually recommend having at least three POM files, even for micro projects. The top level POM should contain the general build configuration (at least the license and the SCA rules), the second level POM should contain the project controlled settings, and the third level representing a module in the build with the actual code. This means that every project is a multi-module build, which allows tight control of the build, creates slick reports, and sets the project up for future growth – all with minimal additional effort.

Edit:See https://github.com/mbeiter/util for an example on how to configure a Maven project as a multi-module build with the CI POM separated from the project POM, as discussed in this post. In this example, the majority of the build configuration is combined with the project configuration in the “shared control” root POM. For a bigger project, the build configuration should be pulled out in a separate project, and made available through inheritance, thus reducing the size (and span of control!) of the root POM (as shown in the illustration).

Build Management, Enterprise Style

Creating secure binaries requires repeatable and reliable builds. Developers should have access to a set of approved tools, as well as a standardized configuration to run security and code quality checks in a consistent way.

Small projects commonly use an ad-hoc process to build software. However, when the teams get bigger, a more structured process proves beneficial. There are a variety of build tools available, some of them delivering a completely automated build, integration, and deployment value chain. Such CI/CD (Continuous Integration / Continuous Delivery [Deployment]) setups are increasingly popular in cloud deployments, where code changes are frequently promoted to production. In such setups, it is crucial to make the build/deploy process simple (“on the push of a button”), but also ensuring the quality of the produced artifacts.

Setting up such a CI/CD production chain is not a trivial task, and requires integration of automated processes, such as static code analysis, white box and black box testing, regression testing, and compliance testing just to name a few. Beyond tools used during the actual build, the CI/CD group is commonly also responsible for maintaining a stable development environment, starting from ensuring availability of dependencies used during the build over providing clean build machines up to maintaining the infrastructure used during any form of black box testing and even production.

Build management tools like Maven only cover a small aspect of the CI/CD deliverables. However, in combination with a source control server (like git), a repository server (like Nexus), and a CI system (like Jenkins) tools like Maven can deliver a surprisingly large set of functionality, and are often a good starting point for small to medium projects.

When creating a new Maven project, I generally recommend putting a few configuration constraints on the system to ensure a minimum amount of build reliability and repeatability. Some of these constraints are more relevant when building commercial products, while others are also helpful for non-commercial builds.

A key constraint is dependency management and dependency retention. It should always be guaranteed that a build can be re-executed at any point from a specific state (e.g. a “tag”) in the source control system. This is not a trivial requirement, as Maven, for example, offers “SNAPSHOT” dependencies that can change frequently. When such a SNAPSHOT dependency is referenced in a Maven project POM file, it is practically impossible to recreate a specific build due to the dynamic nature of these dependencies. These potential inconsistencies are one of the reasons why SNAPSHOTS are disappearing from public repositories such as Maven Central.

It is important to notice though that SNAPSHOTS are not a bad thing per se. They are a very valuable tool during development, as they allow frequent builds (and releases) without cluttering repository servers. Sometimes, an important feature in a library is only available as a SNAPSHOT. This happens frequently in smaller projects that do not release very often.

If a required dependency is only available as a SNAPSHOT, it should still not be used in a production build. Instead, it is better to deploy it in a custom repository server (such as a local Nexus server) as a RELEASE dependency, using e.g. a version number and a timestamp to identify the SNAPSHOT it has been created from.

A local Nexus server not only helps with SNAPSHOT dependency management, but is also a powerful tool to control the upstream dependencies in a project and ensure that these dependencies stay available. As an example, if a project depends on an obscure third party repository that could go away any moment because the third party developers chose a poor hosting setup (temporary unavailability) or lose interest in the project (permanent unavailability), the project is always in jeopardy of temporarily failing builds or, in the worst case, becoming unbuildable. Repository servers like Nexus can be configured as a proxy that sits between the local project and all upstream repositories. Instead of configuring the upstream repositories in the POM, overwrite the remote repository with the id “central” with the proxy server. From this point on, all dependencies will be loaded through the proxy and be permanently cached:

<repositories>
  <repository>
    <id>central</id>
    <name>Your proxy server</name>
    <url>http://your.proxy.server/url</url>
    <layout>default</layout>
    <snapshots>
      <!-- Set this to false if you do not want to allow SNAPSHOTS at all -->
      <enabled>true</enabled>
    </snapshots>
    <releases>
      <updatePolicy>never</updatePolicy>
    </releases>
  </repository>
</repositories>

<pluginRepositories>
  <pluginRepository>
    <id>central</id>
    <name>Your proxy server</name>
    <url>http://your.proxy.server/url</url>
    <layout>default</layout>
    <snapshots>
      <!-- Set this to false if you do not want to allow SNAPSHOTS at all -->
      <enabled>true</enabled>
    </snapshots>
    <releases>
      <updatePolicy>never</updatePolicy>
    </releases>
  </pluginRepository>
</pluginRepositories>

Avoiding Security Vulnerabilities during Implementation

Once a solid approach to architecture threat analysis has been established, most of the remaining security vulnerabilities are coding problems, that is, poor implementation. Examples include injection issues, encoding issues, and other problems such as listed at the OWASP Top 10 Project.

While a checklist of best practices for developers can help with addressing some of these bad coding habits, a more structured and repeatable approach should be established as well. Static application security testing (or “Static Code Analysis” – SCA) can identify most of the code-level vulnerabilities that remain after a thorough architecture threat analysis. However, it is crucial that SCA is executed consistently and automatically.

A common best practices is to analyze any newly written source code prior to compilation or, for scripting languages, prior to promoting it for an intermediate release. Automating this process in a build system / continuous delivery tool chain makes this very scalable and can also ensure that developers follow specific secure coding best practices.

When implementing automated SCA during builds, the project owner needs to make a decision of whether to fail a product build if the SCA process fails. I generally recommend that a developer should be able to run the entire toolchain on their local machine. This allows them to run the entire build locally, as it would be executed on the central build server, with all checks and automated tests, before they commit to source control. This does not only ensure proper execution of security tests, but also other quality assurance tools such as regression testing.

The Hat of Shame (https://www.flickr.com/photos/foca/6935569551)

The Hat of Shame (https://www.flickr.com/photos/foca/6935569551)

However, to improve their productivity, the developers must have the option to skip tests locally. To avoid developers committing bad code to source control, and so trigger unnecessary builds on the central build server, they must also have the option to configure the same tools that are used in the build chain for use in their IDE – with the same rules as used in the central project configuration, so that they can execute the SCA while they are writing the code, and justify skipping the SCA build locally before checking in.

Using such a setup ensures that developers can deliver code that meets the individual project’s standards. I generally also recommend failing the build on the central integration build server if committed code does not meet these standards. In most cases, this is caused by a developer not using the toolchain (including the local tools for the IDE) as instructed and so causing unnecessary work and delays for the rest of the team – which means that this developer is entitled to wearing the hat of shame for a while.

Secure Development Lifecycle and Agile Development Models

The processes I described earlier for security requirements analysis and architecture threat analysis earlier seem very heavy weight, and a question that I get asked frequently is how to use such processes in agile models. At this time, HP is the third largest software company in the world (measured in total software revenue, behind IBM and Microsoft). There is a huge bandwidth of software development models in HP: I have been leading secure software development lifecycle (SSDLC) programs in both HP Software and HP’s Printing and Personal Systems group, working with teams that employed traditional models (“waterfall style”) as well as with teams that used more progressive models (Scrum, XP, SAFe, etc).

With all teams I worked with, it was possible to create an SSDLC program that accommodated the individual team’s working model. As an example, while a team using a traditional waterfall model will perform the requirements and the design analysis in their “planning stage”, an agile team will commonly have already completed these activities in their previous Potentially Shippable Increment (PSI). In other words, while the majority of developers in a team that uses e.g. SAFe may be working on PSI n, part of the team has already started work on the analysis of the requirements and design that will go into PSI n+1.

The steps that need to be performed in a secure development lifecycle program are independent of the development model, but how they are scheduled and executed may be different with every organization. It is important to design the SSDLC program to match a team’s needs, and it is equally important to create metrics for the SSDLC program to match an organization – making sure that the metrics reflect not only the aspects of the SSDLC program, but also fit into the existing model of how an organization is measured.

The Difference between Requirements Analysis and Threat Analysis

Deadlines and budgets in software projects are usually tight, and managers often ask me which would be more beneficial for them to meet their goals: Security requirements analysis or architecture threat analysis?

Asking this question is comparing apples to oranges, as these are two different things and both of them provide substantial benefits. The security requirements analysis helps to ask the best questions to get the requirements right. Getting requirements wrong is a common issue, in particular when complex regulations are involved (which is frequently the case with security requirements). Without proper requirements analysis, the product team may end up doing the greatest job of building the wrong thing.

Architecture threat analysis ensures that the product is designed to be robust and resilient from a security perspective. If this step is omitted, the application may be riddled with security vulnerabilities – and hence not meet basic security requirements either.

The security requirements analysis ensures that the team is building the right product from a security perspective, and architecture threat analysis makes sure that they are building the product right.

The Architecture Threat Analysis

Once all requirements for a project have been gathered, it commonly enters the “design” phase of the development lifecycle. In this phase, the architect(s) turn the prioritized requirements into an application blueprint for coding. This is a crucial phase during software development, as some decisions made here are irreversible once implementation has started (or, at least, very hard to change without significant investments).

During this phase, the security architect starts analyzing the overall attack surface of the design. This analysis is ideally performed on the design specifications created by the other product architects, before any code is written. The assumption is that the implementation of any software component may be flawed, and the goal is to reduce the opportunities for attackers to exploit a potential vulnerability resulting from such a potential flaw. During this step, the design may change by removing or restructuring specific components, and additional (run-time) requirements that mitigate or reduce specific risks resulting from the design may be introduced. An example for design changes may include layered defenses, while additional requirements may include restricting access to specific services and determining the level of privilege required during execution.

Common approaches to threat analysis include attack surface analysis as well as quantitative and qualitative risk analysis. Unfortunately, skilled security architects who can perform an in-depth threat analysis are rare, which usually makes this particular step the most expensive part of a secure development lifecycle program. The key to success is using the available resources wisely, and creating a repeatable and scaled approach that consistently produces high-quality results.

There are several (more or less) structured brain-storm-based approaches for threat analysis. The more structured ones commonly have some level of tool support (e.g. “threat model tools”) which helps to make the process somewhat more comprehensive, while the less structured ones depend fully on the participants’ creativity and security expertise. The inevitable variability in these factors as well as in the participants’ stamina can produce dramatically different results.

Applying a maximally structured approach to threat analysis commonly allows identifying architectural security risks more consistently, more effectively, more repeatable, and at a significantly lower cost. It also allows determining both the risks from the identified threats, and establishing appropriate mitigations. Most importantly, it also achieves completeness that a brainstorm-based approach commonly cannot guarantee: when employing a structured approach, the security architect can utilize measureable criteria to determine when the threat analysis is complete, and not simply because they “cannot think of any more problems to look at.”

Threat modeling is, for the most part, ad hoc. You think about the threats until you can’t think of any more, then you stop. And then you’re annoyed and surprised when some attacker thinks of an attack you didn’t. – Bruce Schneier

The Security Requirements Analysis

Once the main epics of a product release are known, the team can get into a more detailed “what needs to be built” analysis, and even get a first high-level understanding of the “how”.

The majority of the main functional and non-functional requirements can be derived from the product vision. During the requirements analysis, this initial set of requirements becomes more detailed and the architects start adding more comprehensive requirements that are, for instance, derived from best practices. In this step, the Security Architect will start a security requirements analysis to add to the requirements pool for the project. Eventually, this pool will translate into user stories and tasks and be assigned to PSIs (when following an agile development model like SAFe), but we are not quite there yet!

The security requirements analysis usually starts with an analysis of the product’s target market. As an example, if the product is meant to be sold to medical offices in the US or meant to process credit card payments, a lot of mandatory requirements derived from HIPAA and PCI respectively must be implemented by the product, or it cannot be shipped. On the other hand, if the product is mostly used by consumers, there are a lot of best practices that drive requirements for the product, but many of them are not mandatory for the product to be released.

Once the target market has been determined, the Security Architect should reach out once more to product management and marketing to understand if there are specific features that would allow the product to perform better in the market. Commonly, the Security Architect will help marketing and product management to analyze products of competitors, and suggest improvements that would distinguish the product from the competition. Trivial examples include offering encryption or privacy protection where competing products transfer or store data in plain text, implementing strong auditing and giving the customer easy access to such data, and offering secure and innovative authentication mechanisms where competitors only support username / password based authentication.

Security requirements are often derived from laws and regulations which are often far outside the comfort zone and experience of most developers and product architects. Security stakeholders on the customer side are business information security managers and chief information security officers (CIOs) who speak a language of their own, often leading to misinterpretation of the provided non-functional requirements by the product team. A Security Architect performing the security requirements analysis understands both the relevant legal regulations as well as the language used to correctly interpret them, and translates them into a language commonly understood by product development teams to ensure regulatory compliance.

After these preparatory steps have been completed, the Security Architect commonly works with the product architect(s) on a weighted and prioritized requirements list that ties back to the original target market analysis and also shows the inter-requirements dependencies. This requirements list is meant to help product management decide which security feature to implement for a specific release. It is a decision tool that allows product management to understand that if they want to sell the product to a specific market segment, or sell the product in a specific country, the product has to implement specific requirements. Also, the list might have some “non-negotiable” requirements, which must be implemented e.g. to satisfy corporate security policies.

Highlighting requirements inter-dependencies helps with coarse-grained effort estimations. As an example, if requirements X, Y, and Z depend on a complex set of requirements A, B, and C, and X, Y, and Z are required to sell in a specific market, then product management might decide to delay this feature set for a release or two to allow some extra implementation time to implement A, B, and C first, and rather focus e.g. on a different country in the first release.

At the end of the requirements analysis, the product team should have a clear understanding of what needs to be built to address both short-term and long-term security and privacy concerns for the specific target markets, as well as which requirements to implement first, and options of how to implement them so that they can start the product small and grow it long-term, without painting themselves into a corner.

Reduce Expenses for Security by Designing Security into the Product

For the majority of software products, security is primarily a cost factor. Regular readers of my blog keep asking me how they should afford all these expensive and time-intensive security counter measures like code reviews, code analysis, and pen testing.

It is interesting to see that the majority of security related costs in many products still accumulate at the end of the development lifecycle. The closer a product gets to its scheduled release date, the more investments in security are being made. I frequently still see a “test security in” approach in products that quickly evolve in the beginning without considering security, while there are few product teams that try to get the security related parts of the product right in the first place to avoid the high costs of extensive late-stage security counter measures and, in the worst case, major design changes in a late development stage.

Security vulnerability aggregators like the NVD and the underlying security vulnerability databases list around 60 thousand different publicly known vulnerabilities. There are indications from research performed by IBM that the number of actual security vulnerabilities that are not publicly known could higher by a factor of 20, which indicates well over a million open or latent security vulnerabilities in major products that are tracked in the NVD.

The cost of fixing a defect at various stages of the development lifecycle grows exponentially from the requirements stage over design, coding, testing, and maintenance. This observation lead to the undisputed statement that attempts to test quality into a product are generally futile, at least when cost is a factor to be considered. As security is one aspect of software quality, the statement also holds for the unfeasibility to test security into a product. Yet, the pen testing tool and consulting industry is booming, and while many software vendors use security testing tools and pen testing, few are using security requirements and design analysis early enough in the product lifecycle to prevent security issues in the first place and avoid the horrid costs of fixing security defects after the product has been released.

To change a product team’s Secure Software Development Lifecycle (SSDL) approach and ensure acceptance, it is important to meet a product team where they are, and not try to force new development models on them when they are not yet ready for a major change. When working with product teams, I generally try to establish a more proactive model than what the team is using, presenting various options and recommendations, and then work with the team leads to find out what works best for them.

Approach Advantage Disadvantage Rating
Fix security defects as they are discovered (the “backwards facing” approach – post-release). The vulnerabilities get fixed eventually… At least some of them. It is crucial to fix security defects, but waiting until the customer finds them is really a bad idea. Relying on security fixes as the primary means of dealing with security problems is expensive and only covers a fraction of the potential security problems. Extremely reactive (this is bad!), very costly, super inefficient, and generally nothing anyone should do.
Security penetration testing of running code using tools and / or pen testers (“dynamic application security testing” approach, pre-release, end of development). Some of the security issues that the customer would find are now found before the product is released. Helps reduce public shaming. Often too close to the planned release date to fix all issues that are found, the product ships with open security defects. Too late in the development lifecycle, this means that fixes are usually very expensive and might even require design changes (i.e. might never get fixed). Very reactive (still pretty bad!), costly, and generally leads to a “best effort” approach on security.
Analyzing source code for potential security issues (“static application security testing” approach, pre-release, during development) Somewhat improved cost/benefit ratio due to the comparatively early stage of execution. Can be very effective if automated tools are used that force individual developers to analyze their source code before committing to source control. Expensive and somewhat inefficient if a “manual code review by security experts” approach is used. Does not discover significant design problems, and is isolated to source code view (e.g. cannot consider deployment specific issues / implications) Somewhat reactive, because it does not prevent vulnerabilities, but merely removes them.
Using checklists before and during coding (“how to write better code cookbooks” approach, pre-release, during design and development) Good approach to improve security in specific / targeted problem areas. Can in particular help to avoid common pitfalls. Checklists are generic and can never address all of a product’s specific needs. Can lead to a false sense of security, as a fully covered checklist does not allow general conclusions on the security quality of a product, that is, determine the set of still-open security gaps. They are often too generic to draw conclusions on the security status of a specific product. Somewhat proactive, helps with both educating developers and avoiding common security problems. Still somewhat reactive, because checklists are created to address problems that have been discovered in the past.
Systematic analysis of product security requirements and design specific threats Helps to design security into a product early in the lifecycle, and reduces the need for rework, as small architectural changes can greatly reduce the risk of vulnerabilities. Avoids unpleasant surprises at product release by ensuring that all relevant security standards are covered. Although modeling tools are available, in-depth analysis still requires a certain level of security expertise to create a correct model and interpret the results correctly. Such security expertise is not cheap, and not always readily available. Very proactive (which is good), very effective, and probably the most cost efficient way to spend your security dollars.

Typically the best solution is to use all of these approaches as needed in a closed-loop SSDLC program, investing most of the available resources in the proactive counter measures, then in the automatable counter measures, and least in the manual and most reactive counter measures.