Tag Archives: SSDLC Tools

Splitting Control of Your Build

Enabling a CI/CD (Continuous Integration / Continuous Delivery [Deployment]) to create an automated build tool chain commonly requires splitting responsibility and hence control of the build process. A combination of a build management tool like Maven, the Maven Dependency Management plugin, and a reporting engine in a CI tool like Jenkins allows an organization to create a hierarchical control set to specify the behavior of a build.
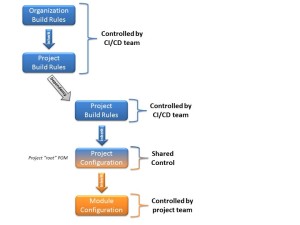
2014-04-18 - Splitting Control of Your BuildAs an example, on organization could decide to put organization wide rules in place on how to run secure static code analysis. The organization could empower the CI/CD team to enforce these rules, and also grant exceptions. The CI/CD team could them make these rules available as two Maven POM files: one with the organization wide rules, and one with project specific exceptions to grant the necessary flexibility.

Projects that inherit their project configuration from the global CI/CD configuration can make further adjustments on a local level, as permitted by the organization’s policy. Maven makes such a setup easily possible through project inheritance, and also allows enforcing usage of the correct ancestors through the Maven Dependency Plugin.

The CI/CD team has a choice of how tightly they want to enforce rules. As an example, they could decide to host the source of the build rules POM files in a dedicated source control repository, or store it with the project sources. They can decide if they want to make these rules a dedicated Maven project, or lump it together with the source code project (I generally recommend making it a separate project to make automated versioning easier).

The illustration shows a common enterprise style Maven build setup in a multi-module Maven build, with the blue boxes representing the centrally controlled components of the build configuration (usually represented by at least two different POM files), and the orange box representing the source code modules under the control of the project team. The blue/orange colored box represents the project root POM file, which is commonly where the main project build starts.

I usually recommend having at least three POM files, even for micro projects. The top level POM should contain the general build configuration (at least the license and the SCA rules), the second level POM should contain the project controlled settings, and the third level representing a module in the build with the actual code. This means that every project is a multi-module build, which allows tight control of the build, creates slick reports, and sets the project up for future growth – all with minimal additional effort.

Edit:See https://github.com/mbeiter/util for an example on how to configure a Maven project as a multi-module build with the CI POM separated from the project POM, as discussed in this post. In this example, the majority of the build configuration is combined with the project configuration in the “shared control” root POM. For a bigger project, the build configuration should be pulled out in a separate project, and made available through inheritance, thus reducing the size (and span of control!) of the root POM (as shown in the illustration).

Build Management, Enterprise Style

Creating secure binaries requires repeatable and reliable builds. Developers should have access to a set of approved tools, as well as a standardized configuration to run security and code quality checks in a consistent way.

Small projects commonly use an ad-hoc process to build software. However, when the teams get bigger, a more structured process proves beneficial. There are a variety of build tools available, some of them delivering a completely automated build, integration, and deployment value chain. Such CI/CD (Continuous Integration / Continuous Delivery [Deployment]) setups are increasingly popular in cloud deployments, where code changes are frequently promoted to production. In such setups, it is crucial to make the build/deploy process simple (“on the push of a button”), but also ensuring the quality of the produced artifacts.

Setting up such a CI/CD production chain is not a trivial task, and requires integration of automated processes, such as static code analysis, white box and black box testing, regression testing, and compliance testing just to name a few. Beyond tools used during the actual build, the CI/CD group is commonly also responsible for maintaining a stable development environment, starting from ensuring availability of dependencies used during the build over providing clean build machines up to maintaining the infrastructure used during any form of black box testing and even production.

Build management tools like Maven only cover a small aspect of the CI/CD deliverables. However, in combination with a source control server (like git), a repository server (like Nexus), and a CI system (like Jenkins) tools like Maven can deliver a surprisingly large set of functionality, and are often a good starting point for small to medium projects.

When creating a new Maven project, I generally recommend putting a few configuration constraints on the system to ensure a minimum amount of build reliability and repeatability. Some of these constraints are more relevant when building commercial products, while others are also helpful for non-commercial builds.

A key constraint is dependency management and dependency retention. It should always be guaranteed that a build can be re-executed at any point from a specific state (e.g. a “tag”) in the source control system. This is not a trivial requirement, as Maven, for example, offers “SNAPSHOT” dependencies that can change frequently. When such a SNAPSHOT dependency is referenced in a Maven project POM file, it is practically impossible to recreate a specific build due to the dynamic nature of these dependencies. These potential inconsistencies are one of the reasons why SNAPSHOTS are disappearing from public repositories such as Maven Central.

It is important to notice though that SNAPSHOTS are not a bad thing per se. They are a very valuable tool during development, as they allow frequent builds (and releases) without cluttering repository servers. Sometimes, an important feature in a library is only available as a SNAPSHOT. This happens frequently in smaller projects that do not release very often.

If a required dependency is only available as a SNAPSHOT, it should still not be used in a production build. Instead, it is better to deploy it in a custom repository server (such as a local Nexus server) as a RELEASE dependency, using e.g. a version number and a timestamp to identify the SNAPSHOT it has been created from.

A local Nexus server not only helps with SNAPSHOT dependency management, but is also a powerful tool to control the upstream dependencies in a project and ensure that these dependencies stay available. As an example, if a project depends on an obscure third party repository that could go away any moment because the third party developers chose a poor hosting setup (temporary unavailability) or lose interest in the project (permanent unavailability), the project is always in jeopardy of temporarily failing builds or, in the worst case, becoming unbuildable. Repository servers like Nexus can be configured as a proxy that sits between the local project and all upstream repositories. Instead of configuring the upstream repositories in the POM, overwrite the remote repository with the id “central” with the proxy server. From this point on, all dependencies will be loaded through the proxy and be permanently cached:

<repositories>
  <repository>
    <id>central</id>
    <name>Your proxy server</name>
    <url>http://your.proxy.server/url</url>
    <layout>default</layout>
    <snapshots>
      <!-- Set this to false if you do not want to allow SNAPSHOTS at all -->
      <enabled>true</enabled>
    </snapshots>
    <releases>
      <updatePolicy>never</updatePolicy>
    </releases>
  </repository>
</repositories>

<pluginRepositories>
  <pluginRepository>
    <id>central</id>
    <name>Your proxy server</name>
    <url>http://your.proxy.server/url</url>
    <layout>default</layout>
    <snapshots>
      <!-- Set this to false if you do not want to allow SNAPSHOTS at all -->
      <enabled>true</enabled>
    </snapshots>
    <releases>
      <updatePolicy>never</updatePolicy>
    </releases>
  </pluginRepository>
</pluginRepositories>

HP Fortify manual rule pack update

With the Fortify products, HP has acquired a great suite of security tools for security static code analysis (“Fortify SCA”). But HP’s security product line-up also includes other tools, for instance for runtime analysis (“Fortify Runtime”, which analyzes code while it is in production) or HP WebInspect for automated black box security testing.

The Fortify SCA products include tools like the “Audit Workbench” that are available to developers, but also server products that are more suitable for a continuous integration environment.

I discussed the Audit Workbench with a couple of developers today, and, during the walk through, came across the auto-update feature. Fortify regularly provides updates to the rule packs, and so makes new scan capabilities available to the users. The update is automated (the default is to check for updates every 15 days, see “Options” -> “Options” menu), but sometimes one wants to trigger the update manually.

It took us a couple of minutes to find it in the documentation, but a look in the bin directory of the installation quickly helped: one can either use rulepackupdate or fortifyupdate to trigger the manual update. While rulepackupdate still works in the current release, it is deprecated and replaced by the new fortifyupdate.

If you are connecting to the Internet through a proxy server: the settings for configuring the proxy hostname and port are in the “Options” -> “Options” menu, under “Server Configuration”.